 |
Welcome to A!Die Software Studio |
第四章 启动 LFS 系统
May, 2012
| 上一章 | 回目录 |
第四章 启动 LFS 系统
Linux 系统的启动和初始化有许多的实现方案,每个发行版本不尽相同,LFS 采用了 System V 风格的初始化风格。
4.1 安装 LFS-Bootscripts 6.3
LFS 的启动脚本被打包在 LFS-Bootscripts 包里面,它只是一些脚本文件,解压后直接进行安装:
root:~# cd /sources

root:/sources# tar xvf lfs-bootscripts-6.3.tar.bz2

root:/sources# cd lfs-bootscripts-6.3

root:/sources/lfs-bootscripts-6.3# make install
要点指示 12:BOOTSCRIPTS 的启动方式
Linux 使用的是基于运行级(run-levels) 概念的称为 SysVinit 的专用启动工具。 它在不同的系统上可能是完全不一样的, 所以不能认为一个脚本在某个 Linux 发行版上工作正常, 于是在 LFS 中也会正常工作。LFS 有自己的一套规则,当然,LFS 也遵守一些公认的标准。
SysVinit(从现在开始我们称之为"init")以运行级的模式来工作,一般有 7 (从 0 到 6)个运行级 (实际上可以有更多的运行级,但都是用于特殊情况而且一般使用不到。 参见 init(8)以获得更多信息),每个运行级对应于一套设定好的任务, 当启动一个运行级的时候, 计算机就需要执行相应的任务。 默认的运行级是 3,下面是对不同运行级的描述:
0: 关闭计算机1: 单用户模式
2: 无网络多用户模式
3: 有网络多用户模式
4: 保留作自定义,否则同运行级 3
5: 同运行级 4,一般用于图形界面(GUI)登录(如 X的 xdm 或 KDE的 kdm)
6: 重启动计算机
用来改变运行级别的命令是init
在 /etc/rc.d 目录下有很多类似 rc?.d (这里 ? 是运行级别的数值) 和 rcsysinit.d 的目录, 里面都包含许多符号链接,其中一些以 K 字母开头,另外一些以 S 字母开头, 这些链接名在首字母后面都跟着两个数字。 这个 K 的含义是停止 (kill) 一个服务, S 的含义是启动一个服务。而数字则确定这些脚本的启动顺序,从 00 到 99(数字越小执行的越早)。 当 init 转换到其它运行级时, 一些相应的服务会停止, 而另一些服务则会启动。
真正的脚本在 /etc/rc.d/init.d 目录下, 它们完成实际工作, 符号链接都是指向它们的。 停止脚本的链接和启动脚本的链接都指向 /etc/rc.d/init.d 目录下的同一个脚本。 这是因为调用这些脚本时可以使用不同的参数,例如 start, stop, restart, reload, 和status。 当调用 K 链接时,相应的脚本用 stop参数运行;当调用 S 链接时,相应的脚本用start 参数运行。
上面的说明有一个例外,在 rc0.d 和 rc6.d 目录下以 S 开头的链接不会启动任何东西, 而是用stop参数调用, 来停止某些服务。 这背后的逻辑是, 当用户要重启或关闭系统的时候, 不会要启动什么服务, 只会要系统停止。
以下是脚本参数的描述:
start启动服务。
stop
停止服务。
restart
关闭服务,然后再启动。
reload
该服务的配置已更新。如果修改了某个服务的配置文件,又不必重启这个服务的时候, 可以使用这个参数
status
显示服务的状态,如果服务正在运行,会显示该服务进程的 PID 。
您可以自由修改启动进程工作的方式(毕竟这是您自己的 LFS 系统)。 我们这里给出的文件只是它们怎样工作的一个示例而已。
4.2 配置脚本
首先需要确定硬件的时钟是否使用了 UTC 时间,通过使用如下命令:
root:~# hwclock --localtime --show
如果显示的时间和本地时间一致,则硬件时钟不是使用 UTC 时间的,需要创建如下文件来将 UTC 变量设置为 0:
root:~# cat > /etc/sysconfig/clock <<  "EOF"

> # Begin /etc/sysconfig/clock

>

> UTC=1

>

> # End /etc/sysconfig/clock

> EOF
接下来我们需要创建一个全局的键盘映射文件 /etc/inputrc,不需要自定义键盘时设置脚本的内容为:
# Begin /etc/inputrc

# Modified by Chris Lynn <roryo@roryo.dynup.net>

# Allow the command prompt to wrap to the next line

set horizontal-scroll-mode Off

# Enable 8bit input

set meta-flag On

set input-meta On

# Turns off 8th bit stripping

set convert-meta Off

# Keep the 8th bit for display

set output-meta On

# none, visible or audible

set bell-style none

# All of the following map the escape sequence of the value

# contained in the 1st argument to the readline specific functions

"\eOd": backward-word

"\eOc": forward-word

# for linux console

"\e[1~": beginning-of-line

"\e[4~": end-of-line

"\e[5~": beginning-of-history

"\e[6~": end-of-history

"\e[3~": delete-char

"\e[2~": quoted-insert

# for xterm

"\eOH": beginning-of-line

"\eOF": end-of-line

# for Konsole

"\e[H": beginning-of-line

"\e[F": end-of-line

# End /etc/inputrc
使用如下脚本来设置主机名:
root:~# echo "HOSTNAME=aslinux" > /etc/sysconfig/network
使用 ifconfig 查看主机 IP 地址后设置 /etc/hosts 文件内容:
# Begin /etc/hosts (network card version)


127.0.0.1 localhost

192.168.237.131 aslinux


# End /etc/hosts (network card version)
接下来是网卡的配置,我通过在 LiveCD 的宿主系统里使用 ifconfig、route等命令获得相关信息后进行设置:
root:~# cd /etc/sysconfig/network-devices

root:/etc/sysconfig/network-devices# mkdir -v ifconfig.eth0

mkdir: created directory `ifconfig.eth0'

root:/etc/sysconfig/network-devices# cat > ifconfig.eth0/ipv4 <<  "EOF"

> ONBOOT=yes

> SERVICE=ipv4-static

> IP=192.168.237.131

> GATEWAY=192.168.237.2

> PREFIX=24

> BROADCAST=192.168.237.255

> EOF

root:/etc/sysconfig/network-devices#
然后配置域名服务器:
root:~# cat > /etc/resolv.conf <<  "EOF"

> # Begin /etc/resolv.conf

>

> domain aslinux

> nameserver 192.168.237.2

> nameserver 8.8.8.8

> nameserver 61.139.2.69

>

> # End /etc/resolv.conf

> EOF

root:~#
最后要创建的一个配置文件是分区表和挂载点的:
root:~# cat > /etc/fstab <<  "EOF"

> # Begin /etc/fstab

> # filesystem    mountpoint   type    options    dump    fsck order

>

> /dev/sda2       /            ext3    defaults    1       1

> /dev/sda1       /boot        ext3    defaults    0       0

> /dev/sda3       /usr/src     ext3    defaults    0       0

> /dev/sda4       swap         swap    pri=1      0       0

> proc            /proc        proc    defaults   0       0

> sysfs           /sys         sysfs   defaults   0       0

> devpts          /dev/pts     devpts  gid=4,mode=620 0   0

> tmpfs           /dev/shm     tmpfs   defaults   0       0

>

> # End /etc/fstab

> EOF

root:~#
4.3 编译 Linux 内核
Linux 内核的配置比较复杂,一些应用可能对内核的配置会有一些特别的要求,不过没关系,我们进入系统后随时都还可以重新编译内核,同时存在多个内核也是可以的。
首先,我们解压内核的压缩包:
root:~# cd /sources

root:/sources# rm -r linux-2.6.22.5

root:/sources# tar xvf linux-2.6.22.5.tar.bz2

root:/sources# cd linux-2.6.22.5

root:/sources/linux-2.6.22.5# make mrproper
这里为了方便,我们直接拷贝宿主系统的内核配置文件再进行设置。打开另外一个 Putty 用root 登录后输入以下命令:
root [ ~ ]# cp -v /usr/src/linux-2.6.22.5/.config /mnt/lfs/sources/linux-2.6.22.5/
如下图所示:
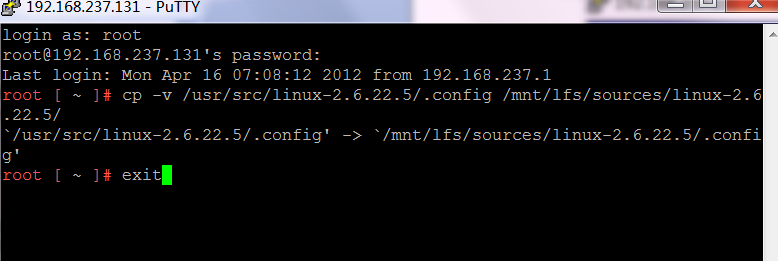
然后输入 exit 命令关闭窗口,切换到之前登录的 LFS 环境的命令窗口,输入以下命令来启动配置界面:
root:/sources/linux-2.6.22.5# make LANG=en_US.UTF-8 LC_ALL= menuconfig
之后,我们将看到如下的配置界面:
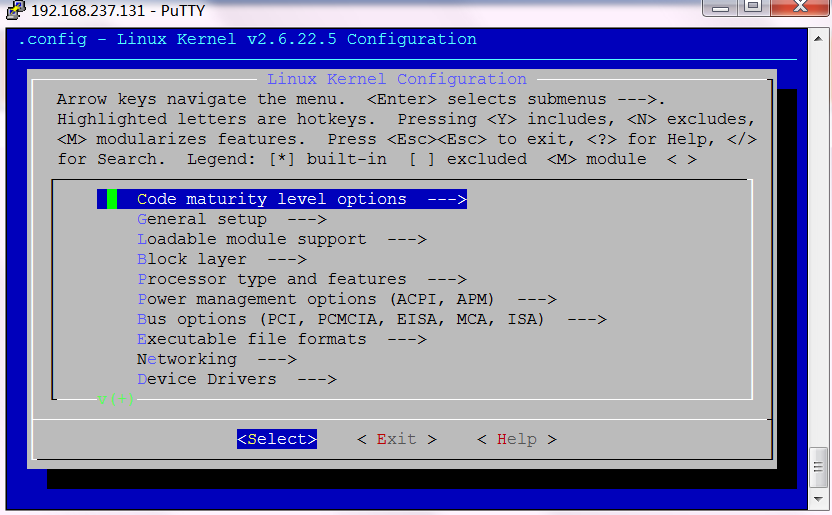
详细的配置方法参考 http://www.adintr.com/media/books/linux_kernel_config.pdf。在这里我们需要确认 SCSI 支持被打开了。
然后按两次 ESC 退出,用如下的命令来安装和配置:
root:/sources/linux-2.6.22.5# make

root:/sources/linux-2.6.22.5# make modules_install

root:/sources/linux-2.6.22.5# cp -v arch/i386/boot/bzImage /boot/vmlinux-2.6.22.5-aslinux-1.0

`arch/i386/boot/bzImage' -> `/boot/vmlinux-2.6.22.5-aslinux-1.0'

root:/sources/linux-2.6.22.5# cp -v System.map /boot/System.map-2.6.22.5

`System.map' -> `/boot/system.map-2.6.22.5'

root:/sources/linux-2.6.22.5# cp -v .config /boot/config-2.6.22.5

`.config' -> `/boot/config-bak-2.6.22.5-aslinux-1.0'

root:/sources/linux-2.6.22.5# install -d /usr/share/doc/linux-2.6.22.5

root:/sources/linux-2.6.22.5# cp -r Documentation/* /usr/share/doc/linux-2.6.22.5/
最后,如果 usb 驱动被作为模块进行编译,为了避免装载顺序引起的警告,需要建立如下的一个配置文件:
root:/sources/linux-2.6.22.5# install -v -m755 -d /etc/modprobe.d

install: creating directory `/etc/modprobe.d'

root:/sources/linux-2.6.22.5# cat > /etc/modprobe.d/usb.conf <<  "EOF"

> # Begin /etc/modprobe.d/usb.conf

>

> install ohci_hcd /sbin/modprobe ehci_hcd ; /sbin/modprobe -i ohci_hcd ; true

> install uhci_hcd /sbin/modprobe ehci_hcd ; /sbin/modprobe -i uhci_hcd ; true

>

> # End /etc/modprobe.d/usb.conf

> EOF

root:/sources/linux-2.6.22.5#
4.4 配置 GRUB 引导系统
首先,我们把 grub 安装到硬盘的主引导分区上,如果你不是按照本文所说的虚拟机硬盘分区的方式进行分区的,你需要调整参数到你的 /boot 目录所在分区上。如果硬盘上还有其他系统的引导程序,执行下面的步骤时务必小心,它会让你以前的系统无法引导,确认这是你希望的后再去进行。
root:~# grub

    GNU GRUB  version 0.97  (640K lower / 3072K upper memory)


 [ Minimal BASH-like line editing is supported.  For the first word, TAB

   lists possible command completions.  Anywhere else TAB lists the possible

   completions of a device/filename. ]


> root (hd0,0)

 Filesystem type is ext2fs, partition type 0x83

> setup (hd0)

 Checking if "/boot/grub/stage1" exists... no

 Checking if "/grub/stage1" exists... yes

 Checking if "/grub/stage2" exists... yes

 Checking if "/grub/e2fs_stage1_5" exists... no

 Running "install /grub/stage1 (hd0) /grub/stage2 p /grub/menu.lst "... succeeded

Done.

> quit

root:~#
上面的 root(hd0, 0) 命令告诉 grub 在哪里去寻找自己的程序文件,他们通常安装为 /boot/grub/state1 和 /boot/grub/stage2 文件。setup(hd0) 在硬盘的主引导分区上安装 grub 的引导程序。
下面我们创建引导系统的配置文件:
root:~# cat > /boot/grub/menu.lst <<  "EOF"

> # Begin /boot/grub/menu.lst

> # By default boot the first menu entry.

> default 0

> # Allow 30 seconds before booting the default.

> timeout 10

> # Use prettier colors.

> color green/black light-green/black

> # The first entry is for LFS.

> title AsLinux(LFS 6.3)

> root (hd0,0)

> kernel /vmlinux-2.6.22.5-aslinux-1.0 root=/dev/sda2

> EOF

root:~# mkdir -v /etc/grub

mkdir: created directory `/etc/grub'

root:~# ln -sv /boot/grub/menu.lst /etc/grub

`/etc/grub/menu.lst' -> `/boot/grub/menu.lst'
: 4.5 重启系统
到此,LFS 6.3 的系统就创建完毕了,在重启系统之前,强烈建议你利用虚拟机的功能对系统做一个快照,如果重启出现问题,你还可以返回这里进行修改。
做完快照后,用以下命令关闭系统:
root:~# logout

root [ ~ ]# export LFS=/mnt/lfs

root [ ~ ]# umount $LFS/dev/pts

root [ ~ ]# umount $LFS/dev/shm

root [ ~ ]# umount $LFS/dev

root [ ~ ]# umount $LFS/proc

root [ ~ ]# umount $LFS/sys

root [ ~ ]# umount $LFS/usr/src

root [ ~ ]# umount $LFS/boot

root [ ~ ]# umount $LFS

root [ ~ ]# shutdown -r now
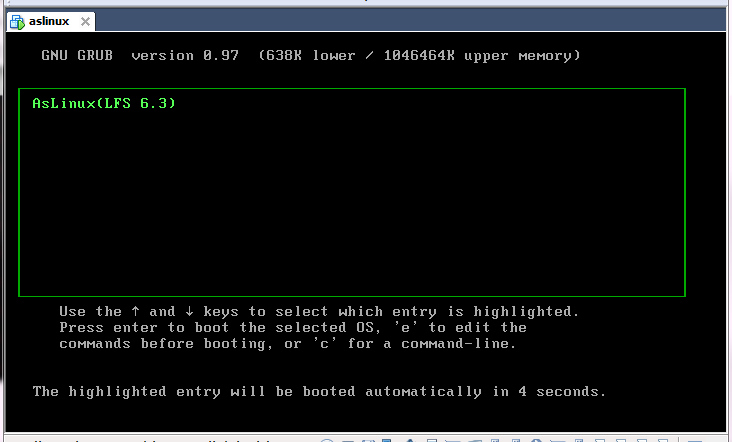
等系统重新启动后就可以看到 LFS 的引导画面了:
系统启动完成后可以看到一个登录的提示,这表示系统已经安装成功了:
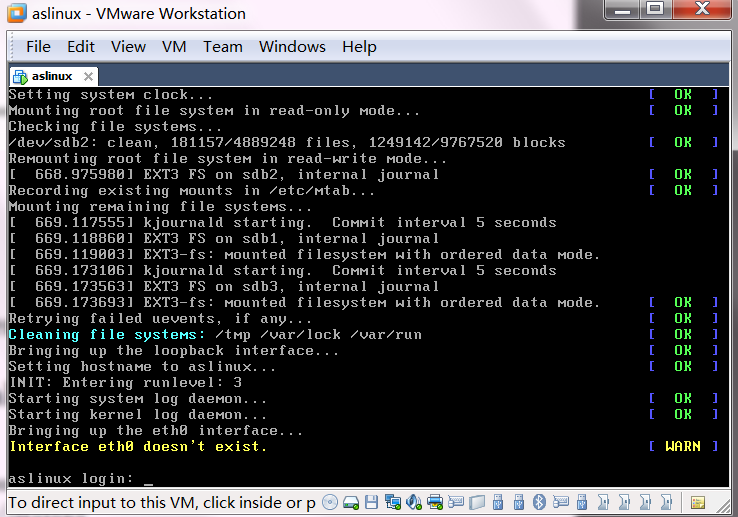
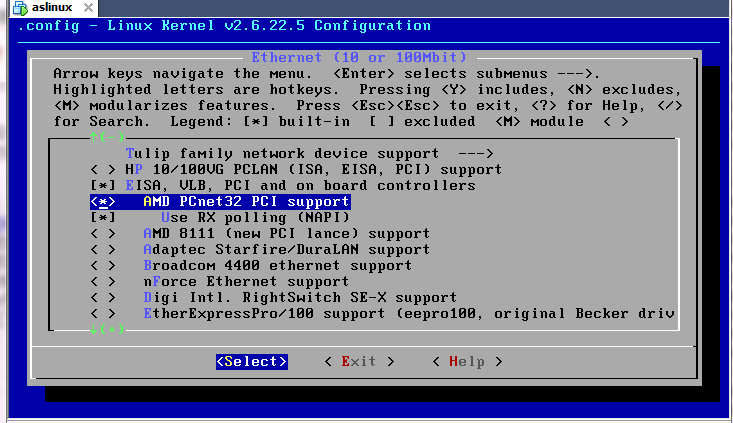
这里出现了一个无法找到网卡的警告:Interface eth0 doesn't exist,这是由于编译内核的时候没有编译 VMWare 的虚拟网卡驱动,注意编译内核的时候需要选中以下这一项:
Device Drivers -> Network device support -> [*] Network device support -> Ethernet (10 or 100Mbit) -> EISA, VLB, PCI and on board controllers -> AMD PCnet32 PCI support.
重新编译内核,并替换启动的内核之后网络就可以正常工作了:
现在系统虽然安装完成了,不过离实用还有一段距离,还需要进一步的完善才能成为一个比较有用的系统,这些内容我们将在之后介绍。
| 上一章 | 回目录 |
▲评论
Hi, 我按照你的流程全部走下来,到最后login的时候总是login incorrectly,请问有什么solution吗?
那是你的密码没输入正确把...
Thank you for you reply.
我又详细看了你的文章,我漏掉了/etc/passwd的设置
郁闷,,,最后一步,重启后
Staring balanced_irq
Using IPI No-shortcut mode
input : AT Translated Set 2 keyboard as /class/input/input1
List of all partitions :
No filesystem could mount root , tried :
Kernel panic - not syncing :
VFS : Unable to mount root fs on unknown-block(0,0)
出现这个错误就停下来了.....
VMware 10 , lfslivecd-x86-6.3-r2145.iso按理说拷贝的寄主系统里可以运行的配置文件呀 想不通.....
ddnzero@126.com 望楼主能解惑!~
被 cp -v /usr/src/linux-2.6.22.5/.config /mnt/lfs/sources/linux-2.6.22.5/
这命令坑惨了....不需要赋值过来,直接用包里解压出来的编译内核即可
再说,我也碰见重启后root密码不对,前面少了一步在root:/sources下的 passwd root ,重新设置一次密码的步骤.
reboot后即可进入系统,总体文章非常好,望博主把这些小瑕疵修正,以免后来人重蹈覆辙.

